
Terraform CI/CD Pipelines with Gitlab
- Ankush Madaan
- Blog
About
Industries
- CI/CD Pipelines, Gitlab, IAAC, Terraform
Share Via
Introduction
Infrastructure as Code (IaC) is an essential practice for modern DevOps and Agile teams to manage cloud infrastructure consistently, efficiently, and with increased resilience. Terraform has emerged as the leading tool for IaC, enabling teams to provision cloud infrastructure across multiple providers regardless of organization size. With Terraform, DevOps engineers can quickly and easily manage cloud infrastructure with code, speeding up the deployment process and ensuring consistency.
In addition to Terraform, Gitlab has become a popular choice for CI/CD management among developers and DevOps engineers. Gitlab’s vast integration with different tools allows for better management of the deployment process, making it an essential tool for organizations looking to streamline their DevOps workflow. By leveraging both Terraform and Gitlab, organizations can manage their cloud infrastructure and deployment processes efficiently and effectively, improving their overall DevOps Process.
The Gitlab advantage
Let’s look at some of the advantages that Terraform and Gitlab together provide along with a walkthrough of how to Integrate Gitlab and Terraform for the management of cloud infrastructure.
- Terraform state management: GitLab can be used to manage your Terraform state files, which can help to ensure that your infrastructure is consistently and correctly managed.
- Integration with other GitLab features: You can use GitLab’s issue tracking, project management, and other features to better manage your Terraform projects.
- GitOps Principles: Incorporate GitOps deployments and Infrastructure-as-Code (IaC) workflows.
- Gitlab Pipelines: GItlab offers managed pipeline feature without the need for managing any dedicated servers like Jenkins
Core Concepts
For the purpose of demonstration, we have published terraform code to the public Gitlab repository here Terraform-Gitlab-Pipeline
Terraform state
Terraform states are like a database for your infrastructure deployment. It keeps track of all the cloud resources deployed and managed by Terraform.
With GitLab, you can:
- Version your Terraform state files.
- Encrypt the state file both in transit and at rest.
- Lock and unlock states.
- Remotely execute terraform plan and terraform apply commands.
GitLab pipeline
Gitlab offers CI/CD pipelines which are defined with the help of gitlab-ci.yml files in the project repository’s root directory. The pipelines feature was initially designed for application code deployments but is now widely used to manage infrastructure deployments also.
Pipeline Workflow
A typical pipeline includes Gitlab’s standard Merge request based workflow for infrastructure deployment
For any infrastructure change required, a feature branch is created from the mainline branch. Once the required changes are done, a Merge Request is raised to integrate the changes in the mainline branch, say main
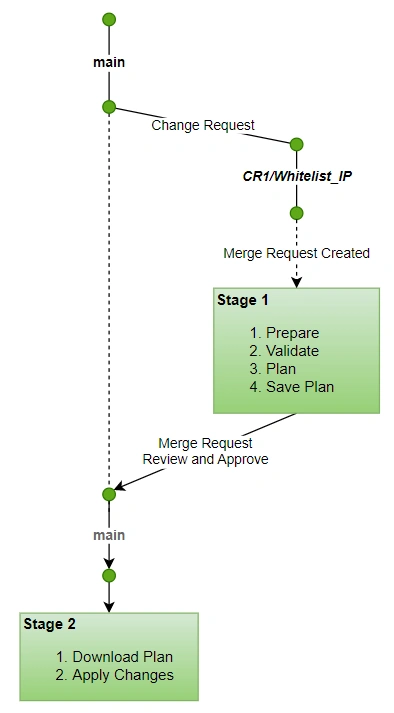
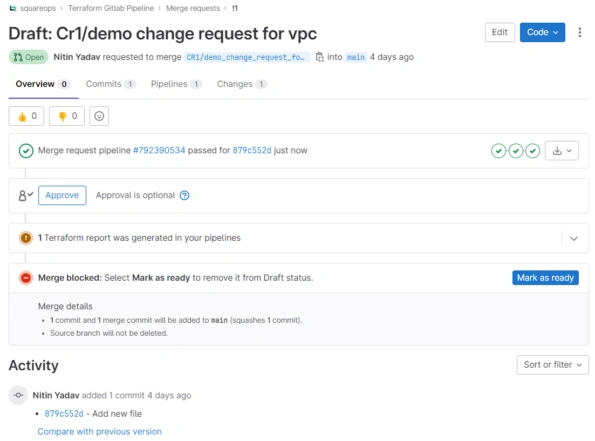
As per this workflow, a new branch is created for an infrastructure change request, from the main branch ( e.g. branch name — CR1/demo_change_request_for_vpc ). The branch is then worked upon, for required changes, and a Merge Request is raised in GitLab for review.
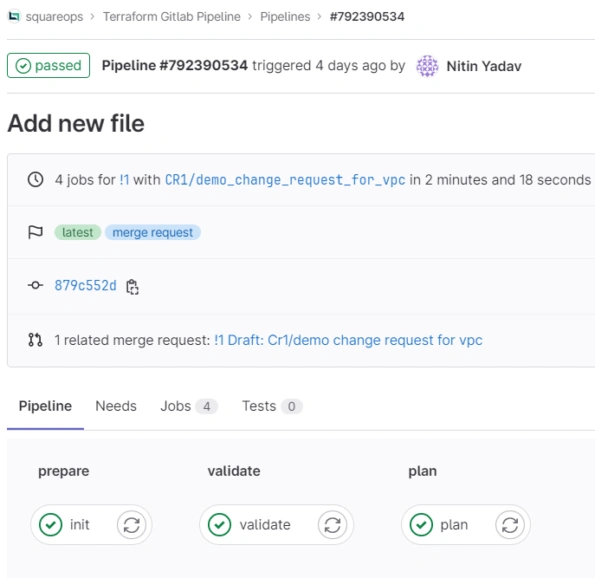
As soon as an MR is raised, the pipeline gets triggered to perform certain terraform tasks related to the first level check of the recent changes. This is stage 1, which includes –
- Prepare: Initialize the terraform code and download the dependent modules
- Validate: Validate the terraform source code for any coding errors and incorrect references using terraform validate command
- Plan: generates a plan depicting the changes to existing infrastructure if the terraform execution is triggered. This step help in evaluating the changes and making the right decision on whether to proceed further with the infrastructure changes
The generated plan[file] is then saved as a pipeline artifact, to ensure the exact planned changes are applied when this Merge Request gets approved
Upon review and approval of the Merge request, the Change is merged into the main branch, leading to stage 2 of the pipeline, this time, taking the pre-generated plan and applying the changes to cloud deployment. The steps are
- Get the plan file
- Apply: Apply the planned changes to the infrastructure. This can be a create or update action that may require some of the resources to be replaced. So evaluate the plan carefully before approval to apply.
This entire workflow is defined herein gitlab-ci.yml file
Pipeline in Action
With the concepts fully explained and the code prepared, the next step is to set up the deployment pipeline for AWS Cloud Resource Provisioning. We will go through a step-by-step guide on how to build this pipeline and expected output results.
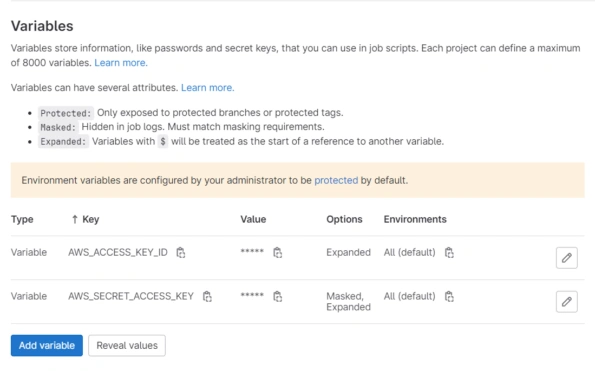
Connect AWS Cloud
The credentials for your AWS account can be configured under the variables section <mention the path, e.g. Settings -> CI/CD-> Variables ( The sensitive tokens need to be masked)
Setup Terraform state backend
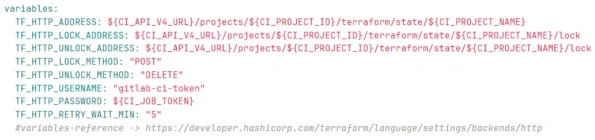
Gitlab is configured as a remote state storage backend in terraform’s backend.tf file
The Gitlab project-specific configuration for backend configuration is defined in the Variables section of the .gitlab-ci.yml file
Trigger Pipeline
In order to simulate the behavior explained above, in the core concepts section,
- create a new branch from the main branch
- Make a change, commit and push the code
- Create a merge request and check the pipeline execution here → CI/CD → Pipelines
- Once the pipeline is executed successfully, the generated plan can be inspected by checking pipeline logs
- Open the Merge request and review the code changes.
- On the bases of code changes and information from pipeline execution, If all seems good, Approve the Merge Request
- Monitor the pipeline again for the progress of changes deployed via main branch
- When the deployment pipeline shows green, it means that all changes have been deployed successfully, and that’s great news!
- However, if something goes wrong and the pipeline shows a failure, then re-check the steps above again in case you have missed anything.
Cleanup
The last stage in the gitlab-ci.yml file consists of the destroy or the clean up action. When manually approved, it executes the terraform destroy command.
- This is added as a handy action to clean up the resources created as a part of this blog
- Just go back to any successfully executed pipeline and click on destroy button
Summary
Let’s summarize the entire deployment process and how it’s helpful :
- Secure code management: GitLab pipelines provide a secure environment for managing code changes, ensuring that only authorized personnel can make changes.
- Smooth infrastructure maintenance: The use of pipelines makes it easier to maintain the infrastructure, reducing the need for additional tools.
- Integrated SCM and CI/CD: The integration of SCM with CI/CD is seamless, enabling pipelines to serve as a natural extension of the code management process.
- Streamlined deployment process: Reducing the dependency on the local system to install any tools and libraries.
- Versatile backend configuration: Backend configuration can also be managed through GitLab pipelines, adding to their versatility.
- Improved collaboration: Using GitLab and pipelines together improves collaboration within teams, allowing for better code management.
- Strong community support: GitLab and Terraform are widely used tools with strong community support, providing access to resources and assistance when needed.
Frequently asked questions
Terraform is an Infrastructure as Code (IaC) tool that allows you to define, provision, and manage infrastructure. GitLab CI/CD can automate Terraform workflows by running pipelines that plan, apply, and destroy infrastructure configurations based on changes in a Git repository.
To set up a pipeline, create a .gitlab-ci.yml file in your repository with stages for terraform init, terraform plan, and terraform apply. Define jobs within each stage to automate infrastructure provisioning based on changes committed to the repository.
GitLab environment variables are used to securely store sensitive data such as AWS credentials, API keys, and Terraform variables. These variables are accessed within the CI/CD pipeline without exposing them in code, ensuring secure and flexible configuration.
The terraform plan command generates an execution plan, showing what actions Terraform will take to align the current state with the desired state defined in the code. Running terraform plan in a pipeline allows you to review changes before applying them to production.
Use remote backends (e.g., AWS S3, Azure Blob Storage) to store Terraform state files, ensuring they’re not stored locally within GitLab. This enables collaboration, secure storage, and access controls for the state, which tracks infrastructure changes.
Use GitLab pipeline rules to control when terraform apply runs. You can restrict the apply job to only run on specific branches (like main or production) or require manual approval for added control, reducing risks of unintended changes.
Use separate Terraform workspaces or create different directories for each environment, each with its own .tfvars file. Configure the pipeline to select the appropriate workspace or file based on the branch or environment specified in the job.
Use terraform fmt to enforce code formatting and terraform validate to check for syntax errors. Additionally, integrate static analysis tools like tflint to catch potential issues and ensure best practices in your Terraform code.
Best practices include using remote state storage, encrypting sensitive variables, organizing infrastructure by environment, running automated plan and apply steps, and reviewing all changes in terraform plan output before applying to production.
Check GitLab’s job logs for error messages, confirm environment variables are correctly set, and ensure credentials and remote backend configuration are accurate. Running terraform init before each plan or apply stage can also help resolve common issues with dependencies and backends.
Related Posts
Comprehensive Guide to HTTP Errors in DevOps: Causes, Scenarios, and Troubleshooting Steps
- Blog
Trivy: The Ultimate Open-Source Tool for Container Vulnerability Scanning and SBOM Generation
- Blog
Prometheus and Grafana Explained: Monitoring and Visualizing Kubernetes Metrics Like a Pro
- Blog
CI/CD Pipeline Failures Explained: Key Debugging Techniques to Resolve Build and Deployment Issues
- Blog
DevSecOps in Action: A Complete Guide to Secure CI/CD Workflows
- Blog
AWS WAF Explained: Protect Your APIs with Smart Rate Limiting
- Blog